In this article, you’ll learn how to create a workflow in HubSpot that automatically sends an internal email notification when a ticket’s status changes to a specific stage - in this case, “Team Member Setup” in your onboarding pipeline.
This ensures your internal team is promptly notified and can take the necessary next steps without delay.
Step 1: Create a Ticket-Based Workflow
-
Go to Automation > Workflows in your HubSpot portal.
-
Click Create workflow and select From scratch.
-
Name your workflow (e.g., Onboarding Status – Team Member Setup Notification).

Step 2: Set the Enrollment Trigger
-
Click Set enrollment triggers.
-
Choose Ticket > Status.
-
Select the appropriate pipeline (e.g., Onboarding) and choose the status: Team Member Setup.


Step 3: (Optional) Add a Delay
If needed, add a short delay before sending the notification
-
Click the + button below the trigger.
-
Select Delay and set the preferred time (e.g., 2 minutes).
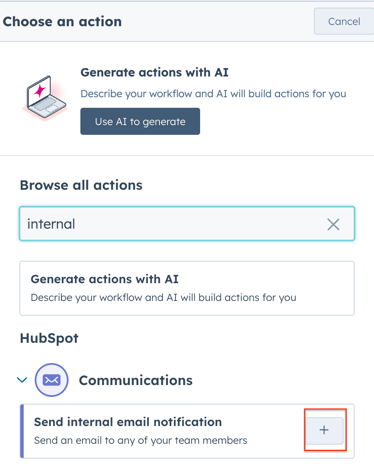
Step 4: Add Internal Notification Email Action
-
Click the + button to add an action.
-
Search for Send internal email notification under CRM > Communication.
-
Select this action.
-
You can choose the HubSpot users who should be notified.
-
Customise the email subject and message to reflect the update (e.g., “A new ticket has entered Team Member Setup”).
Step 5: Review & Turn On the Workflow
-
Review your trigger and actions.
-
Test the workflow using a sample ticket.
-
Click Review and publish to activate.
Best Practices
-
Keep internal emails short and action-oriented.
-
Use personalization tokens, such as the ticket name or company, to make notifications more informative.